OP Moodle
OP Moodle is Otago Polytechnic's online learning site for students. In this guide you will be introduced to the basics of accessing course resources and activities available to you.
Accessing OP Moodle
You can access Moodle through Kāpehu or directly through the OP Moodle website.
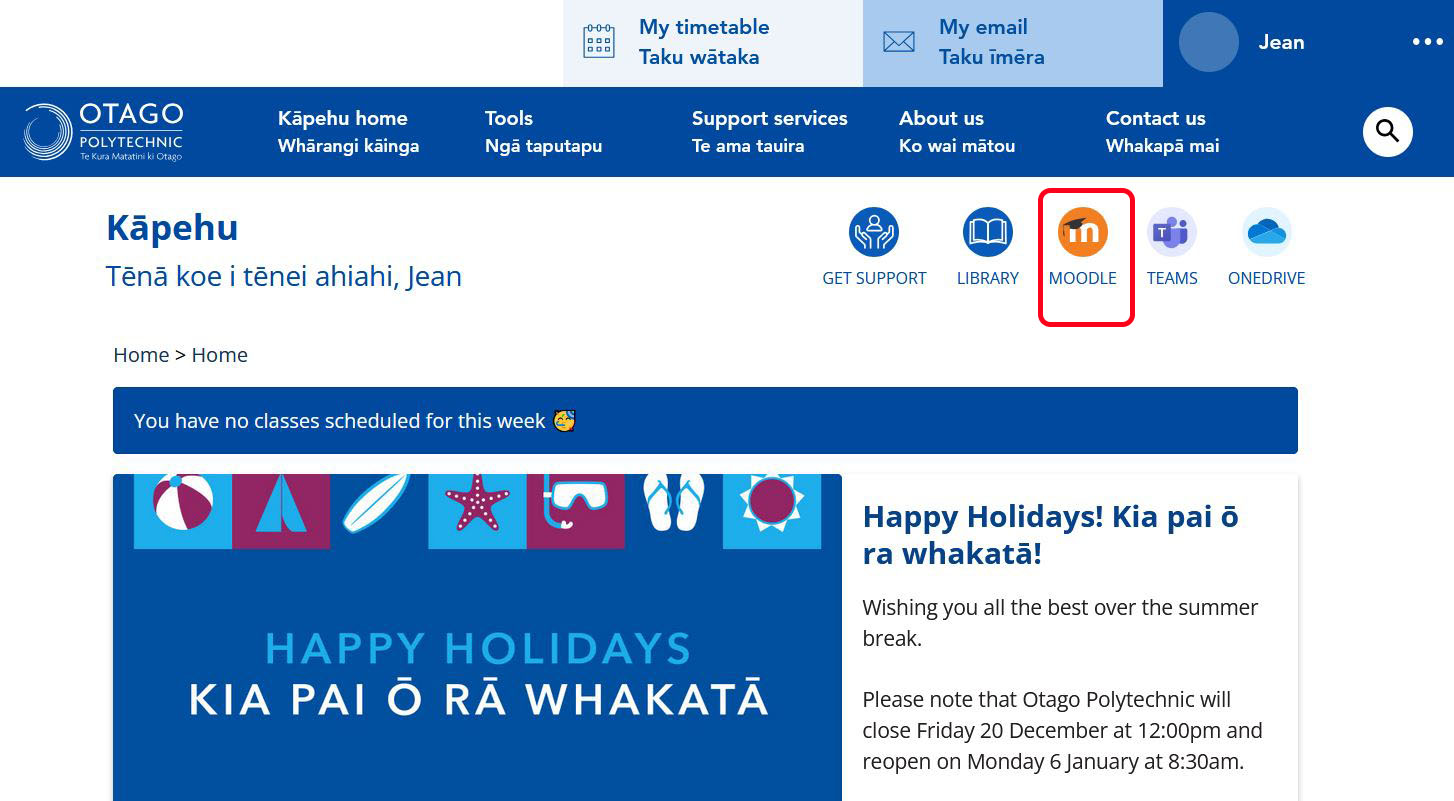
Login through Kāpehu
To get to Kāpehu you will need to log in, using your network username and password.
2. Once logged in, click the Moodle icon.
Login through the Moodle website
You can also go directly to the OP Moodle website.
-
Go to: http://moodle.op.ac.nz/
-
Choose the login option Students and Staff on the left, then enter your username and password into the login area
-
Click Sign in
-
Access your courses from the My Courses section at the top of your screen.
Having trouble logging in?
If you are a first-time visitor, you should have received your username and password in the letter acknowledging your enrolment.
Please contact the IT Support Service Desk if you have any problems using OP Moodle.
If you can log in to OP Moodle but can't find your course, the document, link or activity that should be available, seek support from your teacher.
Learn your way around
Learn to navigate your way around Moodle and make sure you can find everything you need in your courses.
Watch this short video on how to find your way around the latest version of Moodle (note this will look and function slightly differently from OP's Moodle).
User tours
You will notice some pop-ups on the screen when you first access Moodle, called User tours, that will show you around.
If you click Got it you won't see the pop-ups again. You can reset your User tours by clicking on the Question mark on any page, and choosing Reset user tour on this page.
Moodle Dashboard
Your Moodle Dashboard is the home page of your Moodle. You can access your timeline, your recently accessed courses, search, view your badges and more.
Dashboard Timeline
The Timeline provides an overview of all your deadlines (e.g. add submission, attempt quiz, view forum etc.). Each activity is conveniently linked.
You can search by activity type or name, sort by dates or courses, and you can filter by:
- All
- Overdue
- Due date
My courses
Access your courses easily from the My courses tab at the top of the site, next to the Dashboard tab.
Search
You can search for any courses you are enrolled in.
Filter your courses
If you are enrolled in a lot of courses, you might like to remove old courses from your view (or archive and remove them!), and/or star your most commonly used courses, so you can find these quickly. To do this:
- On the course you want to remove from view or star, click the ellipses menu (...)
- Click Star this course or Remove from view as required.
- You can then switch between showing all courses (except Removed from view) or just starred courses by selecting from the drop-down box at the top left of the My courses page.
You can filter/sort by:
- Course name
- Last accessed
And you can choose to view your courses by:
- Card List
- Summary
Change the number of courses shown
The default number of courses displayed is 12. To increase or decrease this:
- Click the box next to Show at the bottom left of the My courses page.
- Choose All or the number of courses you want to show in the My courses page.
Course index
The Course index is a collapsible and expandable component on the left-hand side, which means you can move smoothly between course sections, making it easier and quicker to find activities and resources. One click from the menu will take you to any topic, activity or resource.
Open and close Course index
To open the Course index, click on the list icon. To close the Course index, click on the X (see screenshot above).
Block drawer
Another expandable component on the right-hand side of the screen is the Block drawer. This is where you can add and prioritise blocks. You can choose to collapse or expand blocks, to reduce visual clutter and focus on the learning.
The downside is that important information blocks may not be visible by default when you expect them to be, so remember to open the draw if you are missing information.
Open and close Block drawer
To open the Block drawer, click on the arrow icon. To close the Block drawer, click on the X.
Bread crumbs and Course tab
Another fast way to navigate is to use the breadcrumbs at the top of each page. These breadcrumbs should you how you have navigated to this where you are. You can use them to navigate back without using the back button on your browser.
The Course tab will take you back to the Haere mai section of the course.
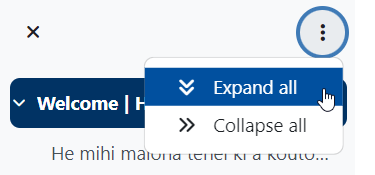
Course index collapse/expand all
Expand all/collapse all options for the course index on the course page.
View a single section
You can focus on one section only in its own page. Navigate to another section from the course index or the Back to course button.
Inside your courses
Most courses will contain these sections or tabs:
The Haere mai tab is the welcome page to your course. You can find information about the learning outcomes, course environment course resources and course communication.
The course schedule tells you what is happening week-by-week. If there is no tab for the schedule, it may appear in the Haere mai section.
Know what you're being assessed on. This information is found in the Assessment tab of your online course.
The Modules tab holds all your course materials and activities.
Completion progress block
This helpful block sits in the top right-hand corner of most course pages (your teacher may choose not to use this function). The Completion Progress block lists the activities you are expected to complete during your course.
How it works:
-
Each activity is represented by a small blue box
-
When an activity is completed, the small box will turn green
-
Sometimes teaching staff will set the box to turn red if an activity is overdue.
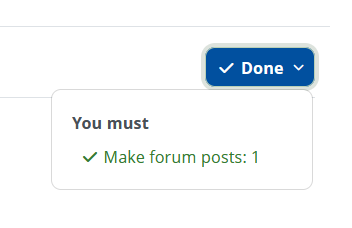
Activity completion drop down menus
You can click on the drop down to the right of an activity to see the details of what is needed to be done to complete the activity, e.g. viewing a book or receiving a grade.
Support – where to find it
Facilitator block
Check out the Your Facilitator block on the right-hand side of your course. This should contain the contact details for your course facilitator.
Student Support Te Ama Tauira website
The Student Support Te Ama Tauira block also appears on the right-hand side of every course page. These links will point you in the right direction to provide support when you need it. There is also a link to the Student Support Te Ama Tauira website in the navigation bar at the top of the page.
Make it yours
Once you have logged into OP Moodle, there are a couple of things you should do straight away to make your Dashboard and Moodle account yours.
1. Editing your profile
The first thing you should do is check your profile and make sure all your information is correct.
To update your profile:
-
Click on your name (at the top right-hand corner of the page)
-
From the dropdown menu, select Profile
-
Click on Edit profile, within the User details section
-
Upload a photo of yourself (optional but recommended).
-
Click Update Profile
2. Your email notifications at OP
Your Moodle notifications will automatically be sent to your OP email address, and we highly recommend you get in the habit of checking your OP account like you do your own personal email accounts. Services like the Robertson Library and OPSA use your OP address to communicate with you, as well as your teachers.
You can also sync your OP email to your phone which makes it even easier to check it regularly, either by adding it to the mail app you currently use or by downloading the MS Outlook app which you can use on either Android or iOS. Check your App store to find and download it.
We do not recommend using forwarding to your personal email account as this connection can break causing you to miss important information.
If you would like your Moodle notification emails to go to a personal email address rather than your OP email address, you can add a notification email in Moodle. Remember, this is only for Moodle and not for any other emails you may get in your OP email inbox.
How to add a notification email address in Moodle
Follow these instructions to add a Moodle email notification address:
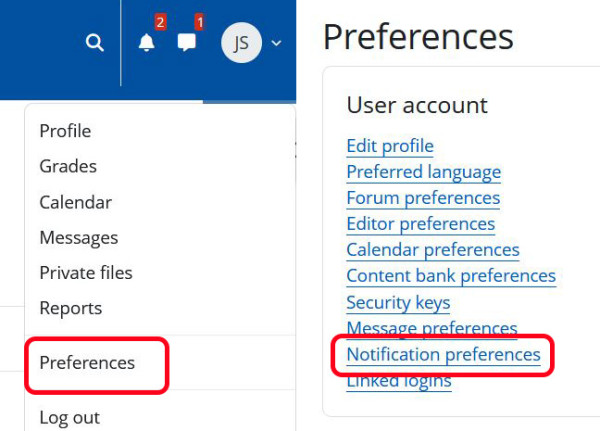
1. On your Moodle Dashboard click on the dropdown menu in the top right hand corner by your name.
2. Choose Preferences from the menu.
3. Under the heading User account, click on Notification Preferences
4. Click on the Email cog
5. Add the email you would like your Moodle notifications to be sent to and click save changes.
Please note, if you leave this area blank if you would like the notifications to be sent to your OP email address.
IT Support Service Desks
Dunedin and Central Campuses - H Block, level 1, Room H107
Auckland Campus - Level 1, Room 103
DN 0800 765 948 AK 0800 111 212
servicedesk@op.ac.nz OR aicservicedesk@op.ac.nz
3. Changing your forum preferences
We also recommend you change your email digest type so you don't get so many emails when posting to forums.
To change your forum preferences:
-
Click on your name (at the top right-hand corner of the page)
-
From the drop-down menu, select Preferences
-
Under User account, click on Forum preferences
-
Alongside Email digest type, select Complete (daily email with full posts)
-
Click Save changes
4. Customising your dashboard
By default you will see Recently accessed courses, Recently accessed items, and your Latest badges.
You can customise your Dashboard to suit how you use Moodle. You can remove these blocks or add any other blocks that are useful to you (e.g. Calendar or Starred courses).
Show more about customising your dashboard
You can change these by enabling Edit mode, then:
-
You can re-arrange blocks by clicking on the relevant crosshair/drag icon and drag the block to where you want it
-
You can add other blocks to your own dashboard by using the Add a block link at the top of the page
-
You can remove an existing block by clicking on the cog icon at the top right of the block and choosing Hide or Delete.
-
You can click on Reset page to default at any time.
When you have finished customising, disable Edit mode. All changes are saved for subsequent sessions on Moodle.
Customise My courses
Filter your courses
If you are enrolled in a lot of courses, you might like to remove old courses from your view (or archive and remove them!), and/or star your most commonly used courses, so you can find these quickly. To do this:
On the course you want to remove from view or star, click the ellipses menu (...)
Click Star this course or Remove from view as required.
Show more about filtering your courses
You can then switch between showing all courses (except Removed from view) or just starred courses by selecting from the drop-down box at the top left of the My courses page.
You can filter/sort by:
- Course name
- Last accessed
And you can choose to view your courses by:
- CardList
- Summary
Change the number of courses shown
The default number of courses displayed is 12. To increase or decrease this:
- Click the box next to Show at the bottom left of the My courses page.
- Choose All or the number of courses you want to show in the My courses page.
Add word counter to your text editor
To add a word counter to your text editor you will need to change your editor to one called 'Atto HTML'. The word count will then automatically appear at the bottom left of the text editor screen.
1. Click on your profile image in the top right corner of Moodle
2. Click Preferences, then click Editor preferences
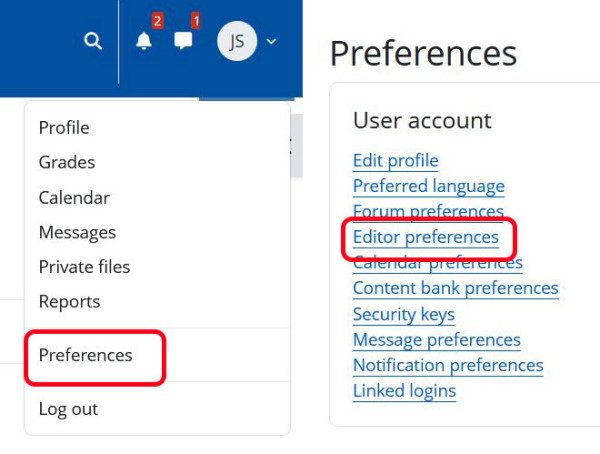
3. Change text editor to Atto HTML editor, then Save
Forums and messaging
There are several ways to communicate through OP Moodle.
Forums in Moodle
Moodle allows teachers to set up online forums for groups or sub-groups of students, which can include text and other media. Participants can receive posts by email, and/or log onto Moodle to view them.
Course announcements
Course announcements are a type of forum that the teachers use to make announcements about your course. Your teacher may use this to let you know about upcoming events, notices or reminders. They appear on the Haere mai page of your course. As a student you won’t be able to post in a course announcements forum, but you can reply to a post from a facilitator.
Messaging in Moodle
The messaging interface in Moodle lets you communicate with others in your course, individually or as a group. A number at the top of the screen reflects the number of people who have sent new messages.
- Clicking the speech bubble icon displays the messaging drawer, divided into starred messages, group messages and private messages
- Contacts and contact requests may be accessed from the Contacts link
- To add a message to your starred (favourited) messages, a star may be added by clicking the three dots when viewing a message
- From the three dots, messages may be muted, so that email notifications of new messages are no longer sent
- Private messaging space - each user now has their own starred area where they can add draft messages, links and notes for later use.
Assessments and grades
Submit an assessment
Using the Moodle assignment drop box you can submit your work for assessment.
Navigate to the Moodle assignment:
Within the assignment, select the Add submission button.
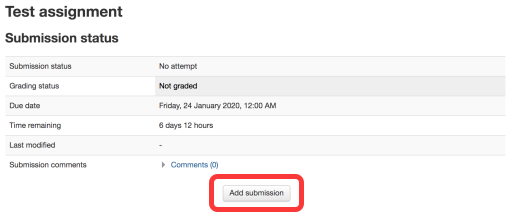
Add a file
You can add a file by:
a) Dragging your completed assessment into the submission box
b) Or picking individual files using the upload files icon
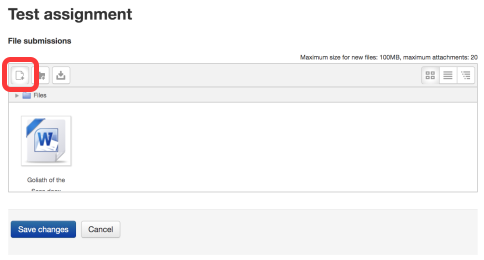
Add a link
Use the link icon to create a link to your assessment in the text box. Note, if there is no text box visible, then this option is not available for your assessment.

Use the Save changes button to submit your files.
You will see the submitted assessment on the Moodle assignment page.
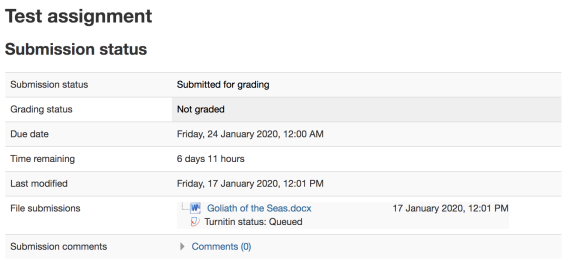
View your grades and feedback
Within each Moodle assignment, scroll all the way past your Submission status and where you can Edit or Remove Submission and you will find the Feedback section.
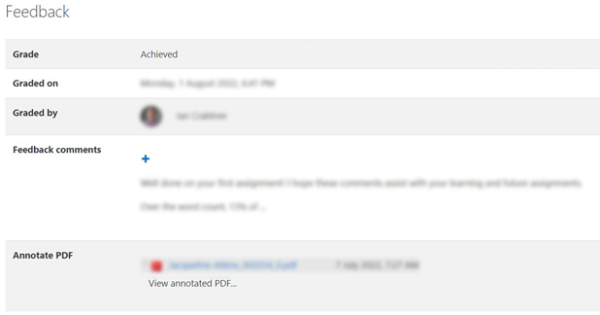
Click on the + sign alongside Feedback comments, to view the full comments from your teacher.

Click on the PDF within Feedback files to see any comments your facilitator may have made within your assessment submission. (This may not appear if your teacher has not used this function).

Software requirements
Viewing, printing, editing and authoring documents
- Microsoft Office 365 is available free while you are a student at OP. You can find more details through the Microsoft 365 page.
- The free Open Office Suite will also allow you to view and edit files.
Viewing & printing documents only
- Adobe Acrobat Reader (free) for .pdf documents
Online study
Learners planning to study online will require access to these things:
- Email programme - it is recommended that you use your student Outlook account, which you can access through Microsoft 365.
- Internet browser - we recommend using Firefox, Chrome or Safari.
- A media player - for playing common audio and video files either as a standalone software (e.g. Windows Media Player, iTunes, QuickTime, VLC media player).
- Adobe Acrobat Reader - displaying PDF files.
- Word processing programme - either Microsoft Word, Open Office, Google Docs, or some other equivalent.
Multimedia players

Attributions
Hero image: Christmas tree light blur. mirekmurmir. Image retrieved from: https://pixabay.com/en/christmas-tree-light-blur-boketh-1226220/ Licensed under Creative Commons License CC0 Public Domain.
Woman and laptop image by Christina Morillo retrieved from https://www.pexels.com/photo/african-american-woman-black-girl-black-woman-chair-1181414/, licenced under Creative Commons License CC0 Public Domain.


