

Microsoft Teams
Teams is a chat-based collaboration tool that provides groups a way to work together online.
Teams versions
Through Teams you can post messages, share files and chat privately with your classmates or teacher. You can also join online meetings or classes. For more information see the accordion section on Teams meetings below.
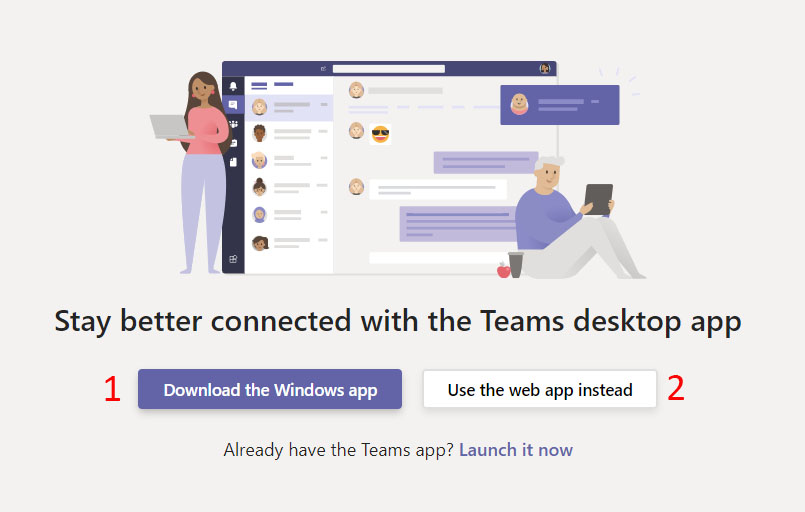
Teams desktop app VS Teams online
You can choose to download an app version of Teams to your desktop or use the online web app version in a browser.
Choose the option that suits you:
| Teams version | PROS | CONS |
| Teams desktop app | Has extended features and desk top notifications. | Takes a one-off time to install onto your computer. |
| Teams web app | Can be accessed on any computer. If you are just joining Teams meetings this is a good option. | Missing some extended features. |
| Using both | Best of both worlds. Can open multiple windows at the same time. Both sync when refreshed. |
Teams app for mobile
Download the Teams app onto your phone and tablet and get notifications and reminders on the go.
Joining a Team
An invitation will be sent to your OP email address. It will look similar to this:

Once you have the invitation, click on the link to open Teams.
Choose the Teams version
A window will open in your browser. Choose the Teams version you would like to use. See table in the section above for reference.
-
Will download the app onto your computer. You will be able to open Teams from your desktop.
-
Will use the web app to join the Team. Bookmark this page in your browser for future use.
Have the desktop app already?
If you already have the desktop app you may see this message pop up, click on it to open in the Teams desktop app.

Accessing Teams outside your organisation
If you are using a Windows computer provided by another organisation that is using MS Office and Teams, you may find it challenging to get access to the OP Teams system.
What this looks like
Teams desktop app and Teams web automatically signs in or prompts for your other organisation's credentials (username and password). When logging out and trying to sign in using OP credentials, the login attempt fails or signs in using the other organisation's details again. Resolutions to this issue vary depending on what policies your organisation has deployed to its computers.
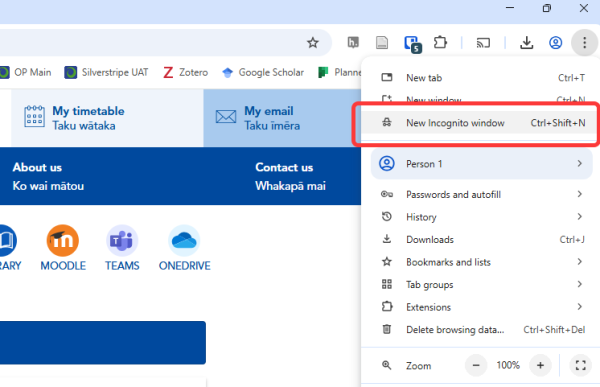
Recommended solution - Use Chrome
This is the most consistently successful solution. If you have any issues with this process, please contact the IT Support service desk.
We recommend you use the same Chrome browser for all your study (different to the one you use for other work), so you can take advantage of single-sign-on when accessing other OP services like Kāpehu, Moodle, and LinkedIn Learning. Once you have your Teams access sorted, bookmark your favourite study sites in the same browser.
Step one - Install Chrome
You must first confirm that Google Chrome is installed on your device before proceeding. Chrome will either be present in the desktop taskbar, or from the start menu. You can get Chrome by clicking here and choosing the download option. The Chrome installation does not require administrator privileges.
Step two - Use an incognito window
Open Google Chrome and then open an Incognito window.
Step three - Open Teams
Once the incognito window is open, you can navigate to https://teams.op.ac.nz. The following page that appears will ask you to sign in using your OP credentials. You may need to enter your OP email before it asks for your username and password.
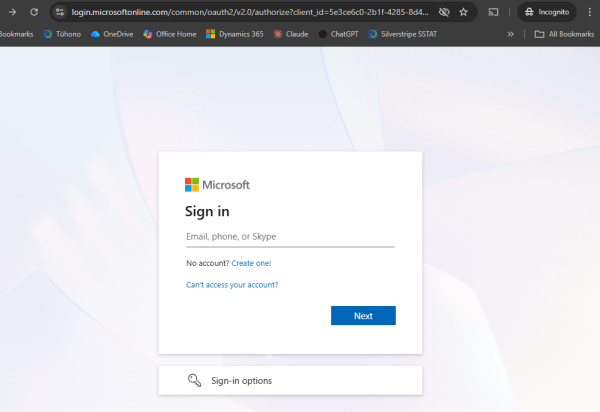
Once the login process has completed successfully, the Microsoft Teams web app will load. You can now use Teams as you would in the desktop app or your regular browser.
Problem with the mic or camera?
Occasionally Chrome has default settings that does not allow Teams to access your microphone or camera. If you suspect this may be happening, go to Settings > Privacy and Security > Site settings, and under camera and Microphone, ensure that access is allowed to https://teams.microsoft.com.
Using Teams

Channels
Channels are topic headings which sort posts, files and features into categories.
- You may have several different channels in your team which are set up by your teacher.
- Use the relevant channel topic when asking a question or posting a comment to ensure you get the right answer and you can refer to it easily.
Posts/Conversations
Posts, or conversations, contain a chronological feed of messages.
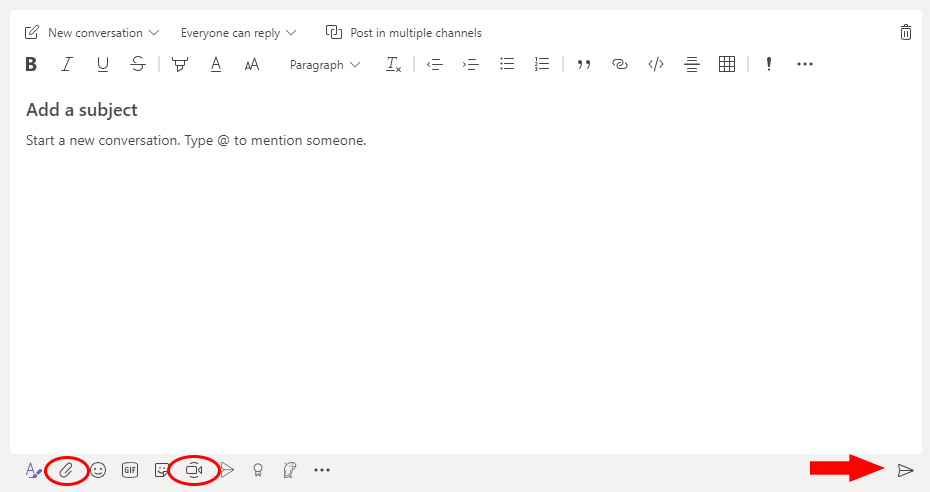
New conversations
Start a new conversation at the bottom of the feed in the text box.

Click on the Format icon (A icon) to open a bigger text box.
-
Add a subject line for easy reference.
-
Attach files with the paper clip icon.
-
Click the arrow when you are ready to post.
- Use the Meet now button to start a meeting in the channel.
Replying to a conversation
Click reply to open a text box to reply directly to a conversation thread. Don’t be tricked by the text box below the post!


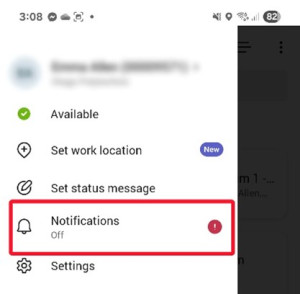
Notifications
An email will be sent automatically to you or the whole team when there is tagged activity in a channel.
-
Check your OP email to see what messages have come up
-
You can click on the link in the email to take you back into the Team conversation.
- Make sure you have the notification setting on in your app to get notifications on your phone, tablet or desktop.
Turn on notifications
| App view | Desktop view |
|
|
|
|
Channel tabs
Along the top of the posts screen you will see a menu with tabs. These are tabs inside the channel. These could include Files, Stream video recordings, Polly etc.
Files
Your teacher may store files here for your courses. Any uploaded files in posts will be stored here as well.
You can also upload files for collaboration with your classmates or teacher.
Accessing and editing a file through Teams
Open a file: When you open a file in Teams you can view it and add a post/conversation about the file on the right hand side bar (open with speech bubble icon at top right). Conversations will show in the posts feed with the file. You will not be able to edit it.
Edit a file: You will need to open it with either the Desktop app, or the Browser app. Click on the ellipse at the top right of your document screen.

Tip
All of these options will save automatically, be careful as any changes or deletions will be saved.
|
|
|
|
|
|
 Activity


 Assignments
 Calendar
  Calls
Calls Files
FilesTeams meetings
You can meet several ways using teams:
-
Join a scheduled meeting/lesson
Join a scheduled meeting/lesson
For online video lessons your teacher may use Teams meetings so that you can all meet online, chat and share files.
You will need to be connected to the internet to join the meeting/lesson.
Joining a meeting
Your teacher will book a meeting and invite you to join it.
You can join the meeting by either:
- Following the link provided you by the teacher. This may be posted in your Moodle course. OR
- An invitation could be sent to your OP email address:
- Accept the meeting invitation and click Join meeting in your calendar
- Or simply click Join Microsoft Teams Meeting in the email invitation.

Once you have clicked either type of link it will open in a browser and look like this:

Option 1. Will use the web app to join the meeting and will continue on in the browser. This has the advantage that you don’t need to download anything to join the meeting.
Option 2. Will download the desktop app onto your computer. You will be able to join your meetings from here.
Option 3. Will open the Teams desktop app if you have already download it.
Once you have chosen an option your meeting window will open.
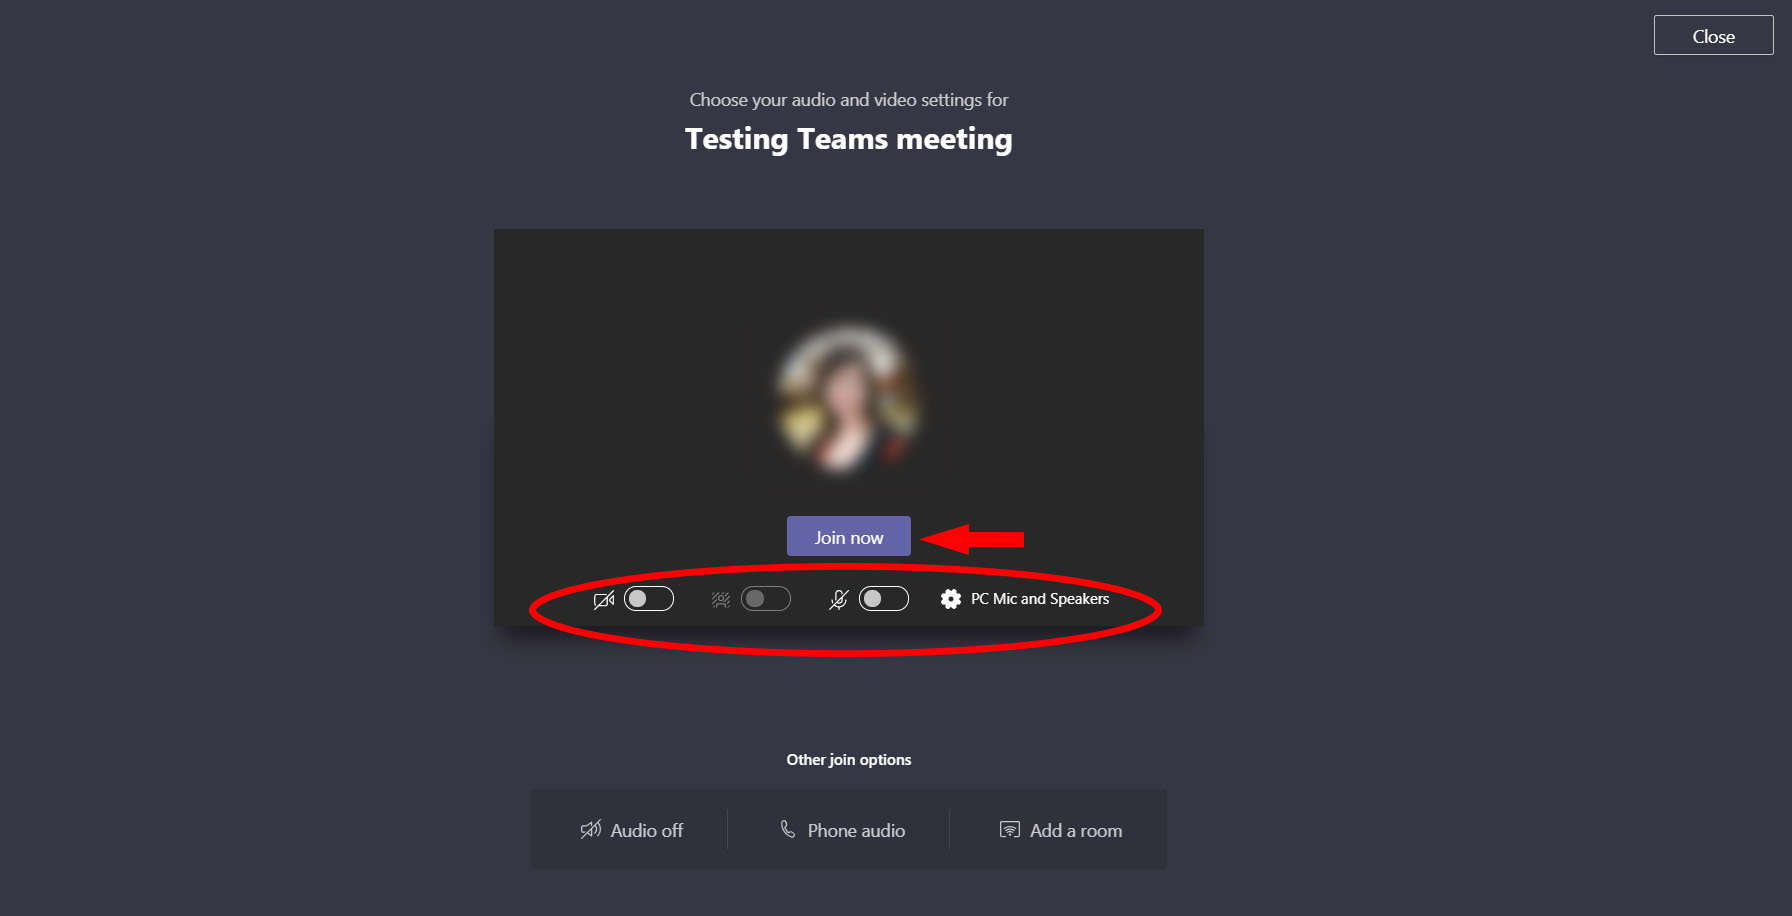
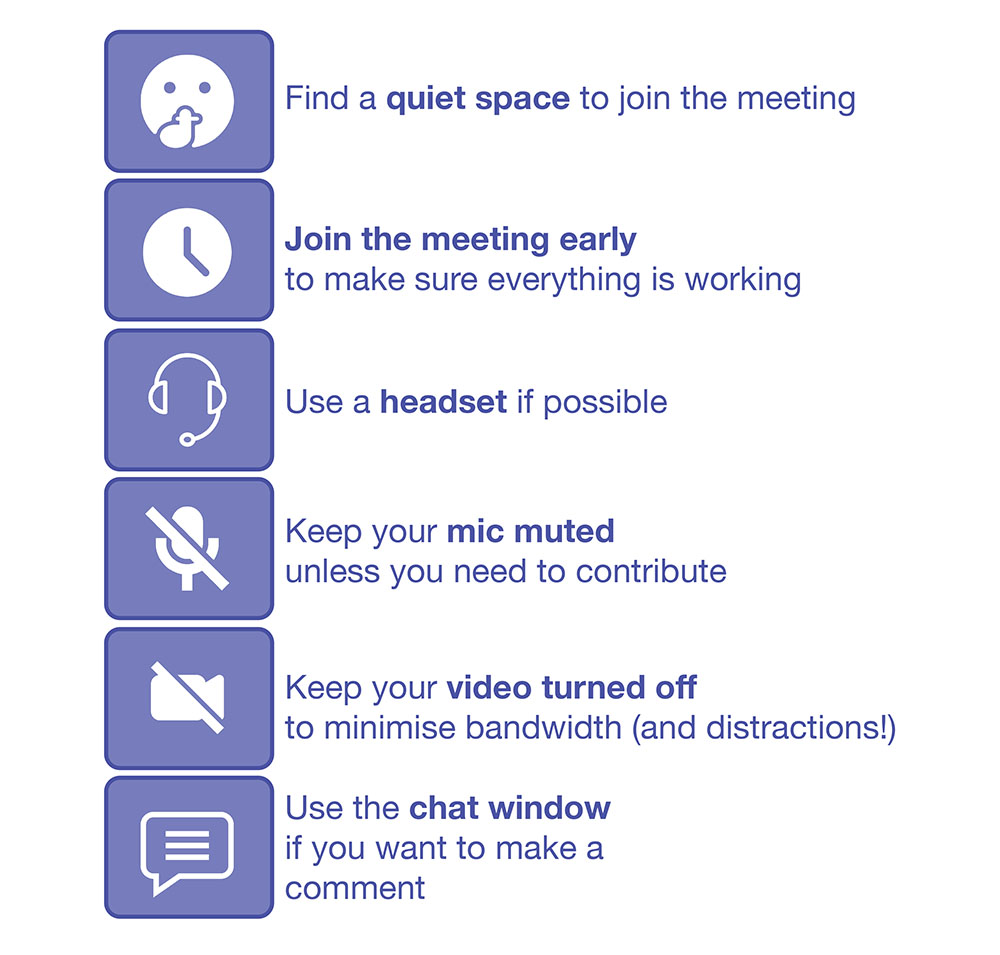
Before you click Join now
-
Check your audio connections. Is Teams using the correct input/output audio device?
-
Turn your audio off – only turn it on when you need to speak
-
Turn your video off – avoid taking up too much bandwidth
Once you are ready, click Join now.

Join a Teams meeting
Watch a short video on joining a teams meeting.
1:31Inside a Teams meeting
The menu bar contains all the functions for your meeting. It appears in the bottom middle of the meeting screen. If it disappears, roll your mouse over the screen and it will pop up again.
Make sure your microphone is on mute and your camera off. Only turn your microphone on if you want to directly participate in the conversation. Turn these functions on and off with the menu bar below by clicking the icons. If you are having trouble with your device settings see the troubleshooting section below.

Chat function
While you are in the meeting you can chat with everyone with the chat function.
To show the chat side bar click show conversation on the menu bar below. A side window (chat side bar) will pop up on the right side of your screen.

 |
Meeting chat window• Type into the replay text box and press send or enter when you are ready to share. • Open a bigger text box by clicking the format button (A symbol) at the bottom left. |
Share files
In the chat window you will see an attachment icon (paperclip). You can use this function to upload and share a document with the class.
Share your screen
Sometimes you may be asked to share you screen. Click the share icon in the menu bar and then click on the screen or document you would like to share.

Ending the session
When the lesson/meeting is over, leave the session by pressing the red hand hung symbol.

Troubleshooting
Sound issues
- If you can’t hear people talking
Check your device settings. Make sure that your audio devices, speaker and microphone are set to the correct setting. If you are using a headset you may need to choose this option in the audio device pop up menu.
Click the ellipses in the menu bar and choose Show device settings.

Chose the correct audio device setting with the drop down menu.

- If they can’t hear you
Check you don’t have your microphone on mute.
Check your audio device settings to make sure that the correct device is being used by Teams, as above for speaker settings.
Watching the video of the meeting
If the meeting is being recorded, the video will be available shortly afterwards in the relevant chat thread (you might need to scroll up to find it) or channel. You teacher might also share a link to the recording.
Download the app
You can use Teams through your phone.
See the section above on the Office 365 page on ‘how do I download Office 365 for free’ to download the Office products onto your computer.
Teams recordings
You can rewatch Teams recordings, such as online lessons or recorded assessments. Where you find the recording depends on how the meeting was set up. It may be available:
- in a Team channel
- in a Meeting chat
- in a Chat
- From a link shared by your teacher
Your teacher should let you know which location the meeting has been recorded to. Follow the instructions below to find your recording in the various locations in Teams.
Find a Teams recording in a Channel
If your lesson or meeting was held in a Teams channel, you'll find the recording in that channel.
1. Open Teams and select your Team and channel.
2. Select the Posts tab (you’re probably already there).

3. Find the meeting post (look for the meeting title), then open it. You may need to select See details to view the recording.
4. Select View recap to watch the recording.
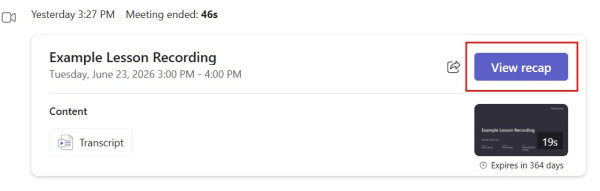
You can also find the recording in the Shared tab, in the folder called “Recordings”

Find a Teams recording in a Meeting chat
If you attended a meeting that wasn’t held in a Teams channel, the recording will be in the Meeting chat.
1. Open Teams and go to Chat (left-hand menu).
2. In Chat, find the Meeting chats tab at the top and look for the meeting.
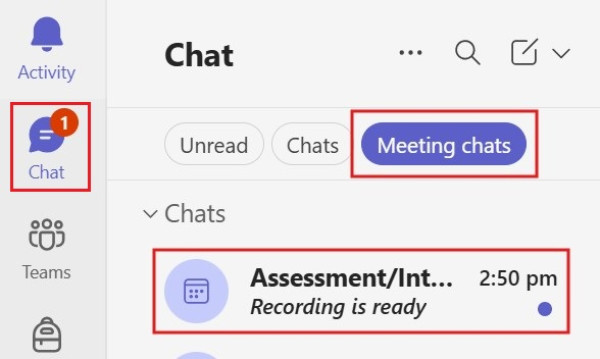
3. Open the meeting chat and select View recap to watch the recording.
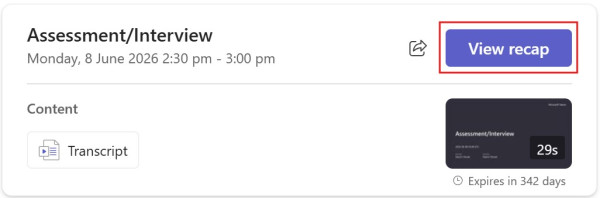
Find a Teams recording in a Chat call
If the recording is from a video or audio call started in a one-to-one or group chat, you'll find it in that Chat.
1. Open Teams and go to Chat (left-hand menu).
2. Open the one-to-one or group chat where the call took place.
3. Find the call in the conversation. You may need to select See details.
4. Select View recap to watch the recording.
Tips
- Recordings may take a few minutes to appear after the meeting ends.
- You can usually access the recording from the same meeting chat, Team channel, or chat where the meeting or call took place.
- Some recordings are only available for a limited time.
- Make sure you're signed in with your OP student account.
- Use the Teams search bar to search for the meeting name.
- Still can't find your recording? Contact your teacher.
Using Breakout rooms
Breakout rooms are virtual rooms you can join while in a meeting. These virtual rooms are usually for a smaller sub-group of people in a meeting, and can be used for discussion, planning and group activties.
Note: Only meeting organizers can create breakout rooms.
Join a meeting
The first step to using Breakout rooms is to join a meeting.
You can join Breakout rooms from the Teams app on your computer or mobile, or from a web browser like Edge, Chrome, and Firefox. See the section on Teams versions for more information.
Join a breakout room
-
By default, you'll be moved into your assigned breakout room as soon as your teacher opens the room. No action is required on your part.
-
If your teacher has turned off the automatic setting, you'll receive a message notifying you of the open breakout room. Select Join Room on desktop or Join on mobile to join the room.
-
If you're joining from your mobile device, do not navigate away from the meeting while your teacher is setting up rooms.
-
You'll also receive notifications to rejoin the main meeting or if you are moved into another room.
-
If you need to switch devices during the meeting or join with two devices, you'll still stay in the correct breakout room.
Chat in a breakout room
Each breakout room will have its own chat. You'll be able to access it from your chats list and from Chat in the breakout room.
-
You will be added to a breakout room chat when your teacher starts the room. You'll be removed from the chat when the room is closed.
-
You can still see the chat history and any files shared after the breakout room is closed, including meeting recordings.
Return to the main meeting
By default, your teacher will control when you return to the main meeting. No action is required on your part.
-
If your teacher has enabled it, select Return to rejoin the main meeting discussion.
-
Head back to your breakout room by selecting Join room.
Teams assignments
Teams assignments can be used to submit assessments and to record your work and learning. Teams assignments can include quizzes, assignments and ePortfolios (usually using PowerPoint).
You can use it on your phone and desktop and it will sync between them. See the section on Teams versions to download the app.
Getting started
If you haven't already, follow the instructions below to get set up with Teams.
Using Teams assignments
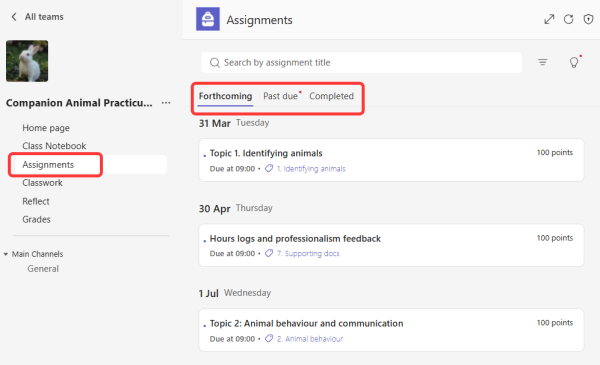
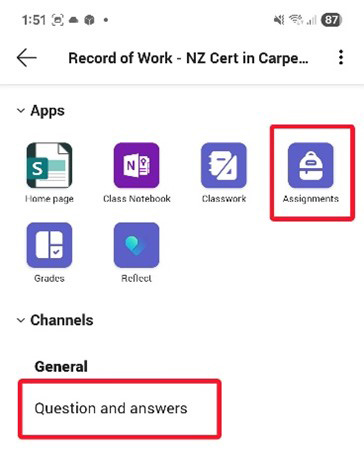
Step 1: Find Assignments
Assignments is where you submit your assessments.
| Desktop view |
|
|
Inside the Team you will see Assignments in the left hand navigation area. Inside Assignments, you will see three categories of assignment: Forthcoming, Past due and Completed. |
| App view |
|
|
Inside the Team you will see Apps and Channels. Assignments sits inside the Apps section. Note: Use the channels to communicate and ask questions (the channel/s may be called something else). Your facilitator will sometimes post here which will notify your email and the app. |
Inside an assignment
Under the Forthcoming tab, you should see your assignments.
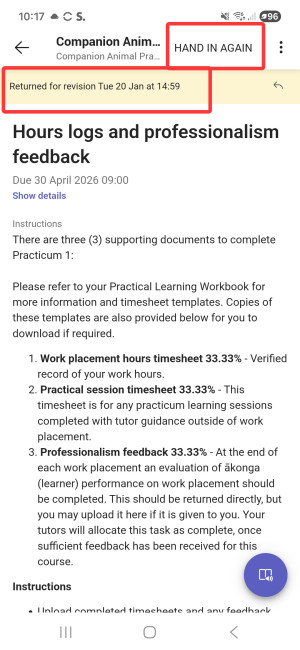
Inside each assignment are instructions. There may also be a document to work directly in (see examples below), a document to download or instructions to attach something.
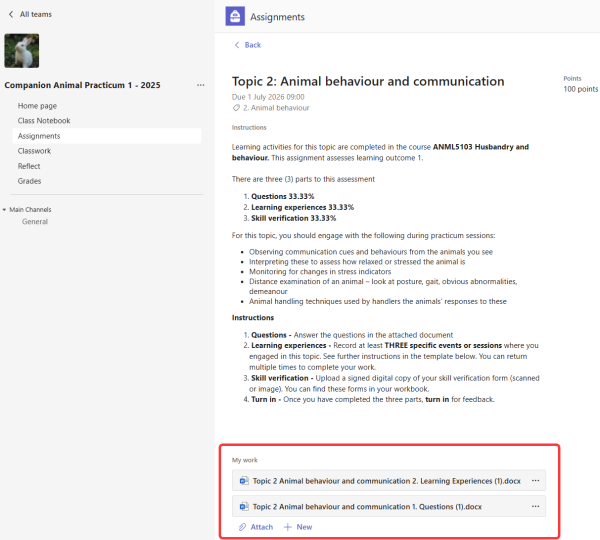
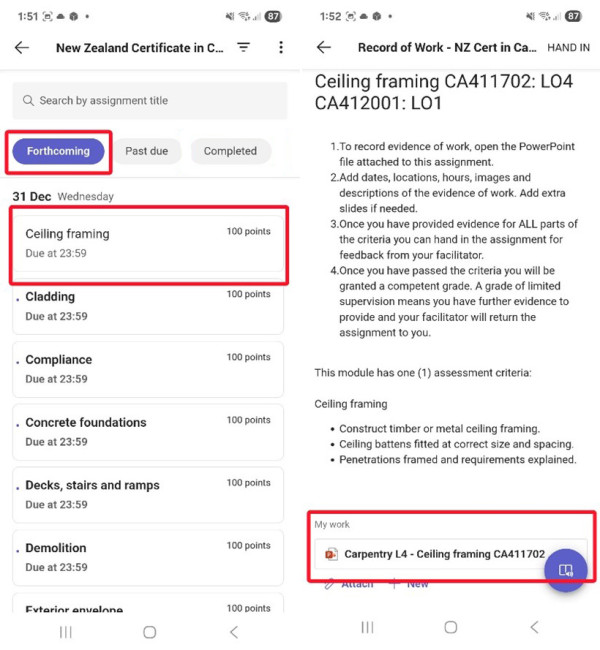
Working inside Teams assignment documents
You can work directly into the assessment documents provided in Teams, these are your versions and can only be seen by the teacher.
When you click on the document it will open in a Microsoft app so you can edit directly. It will automatically save as you work.
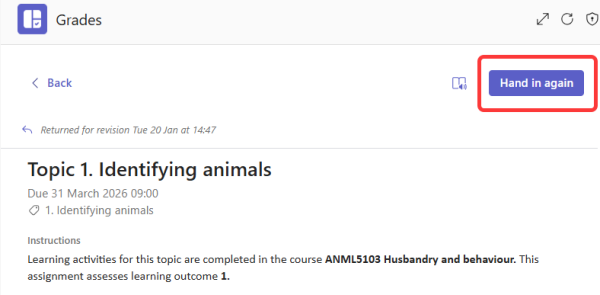
Handing in
When you have completed the assessment, you can submit it to your teacher by clicking the Hand in button at the top right of the screen.
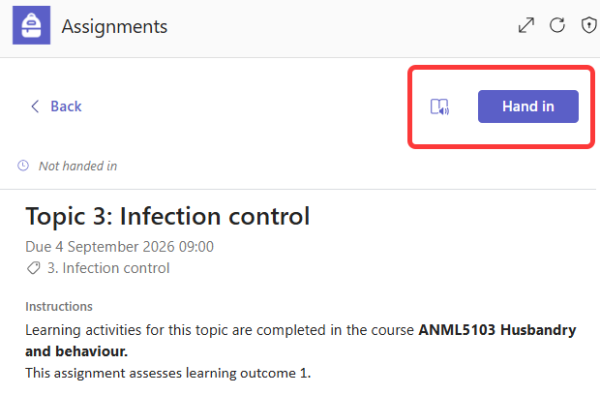
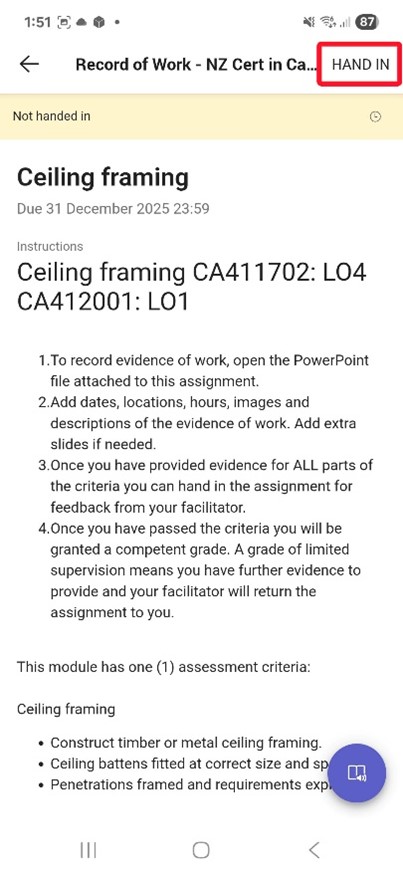
Note, you can reverse handing in by clicking the Undo hand in button.

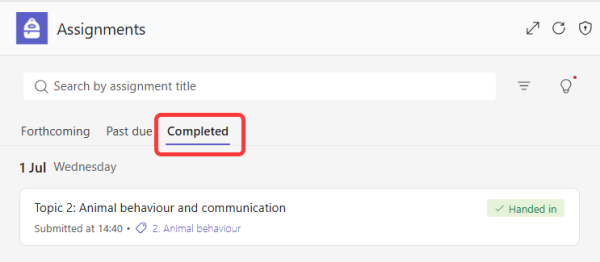
You can see your handed in assignments in the Completed section of Assignments.
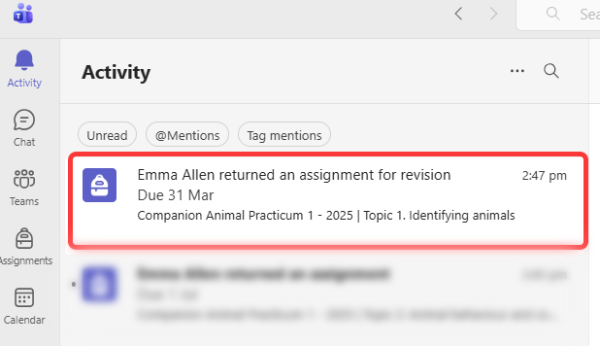
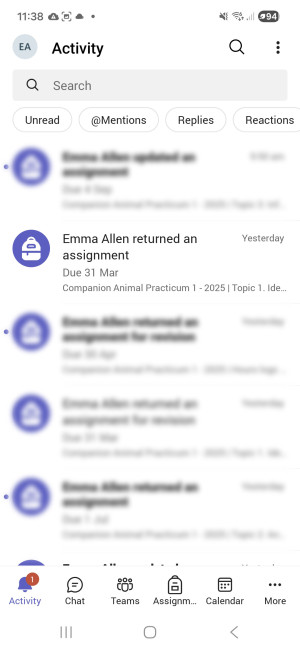
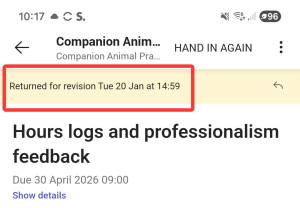
Returned assignments
When your teacher has marked your assessment, they will return it to you, and you will receive a Teams notification.
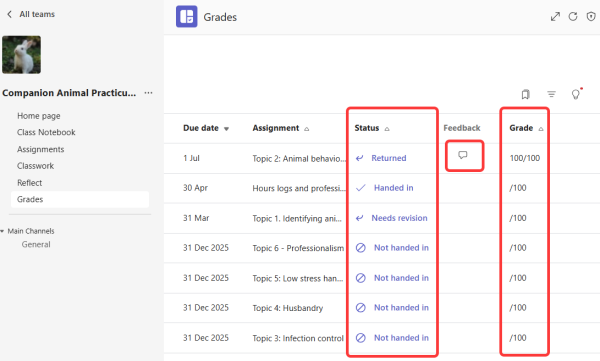
Grades section
In the Grades section of Teams you can see your grades and the status of all your assignments.
Depending on the assessment you may receive:
- A mark out of 100%
- A completed/passed mark
- Or, a needs revision
If you receive a ‘needs revision’, it means there are parts of your assignment that need to be looked at again, or are missing.
Feedback
Your teacher will provide feedback about what you need to work on to complete the assignment. You can see the feedback as a speech bubble in the grades.
| Desktop view |
|
| App view |
|
In the app, you can only see marks in grades and assignments, not status. Enter into each assignment to see the status.
|
Teams and PowerPoint
PowerPoint can be used inside a Teams assignment as a way to record your work and learning in a ePortfolio. You can use PowerPoint and Teams together on your phone and your laptop.
Note: The following instructions are for Carpentry in the Teams app; however, the method is the same for any record of work/learning that uses Teams assignments and PowerPoint.
If you need help getting started with Teams and Teams assignments visit the sections above:
Firstly, follow step 1 and step 2 in the Teams assignments to enter Teams and open an assignment.
Each assessment contains a set of instructions and the assessment criteria.
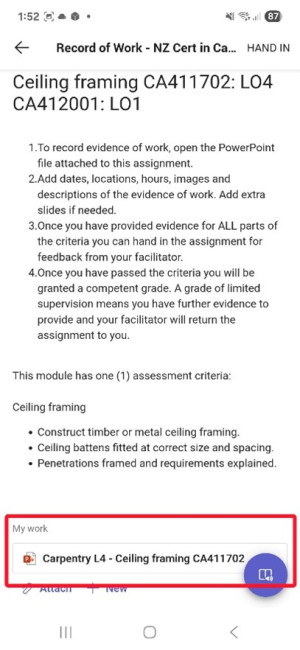
|
Click on the PowerPoint file at the bottom to add evidence. |
Editing the PowerPoint slides
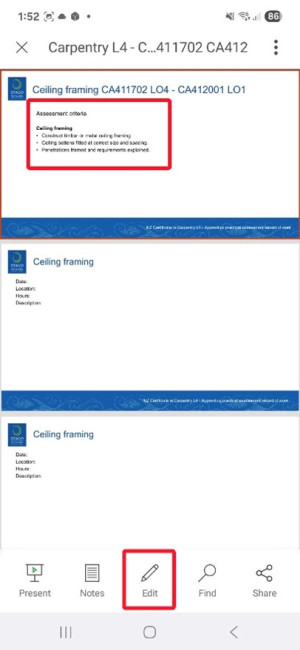
|
The assessment criteria appear again in the slides, so you can refer back to it. To edit, press the Edit button at bottom of the screen. |
Add images to the slides
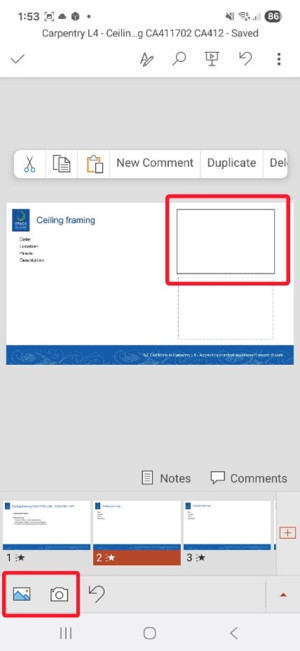
|
Add an image by selecting the image block and either adding an image from your Image Gallery or taking one directly. |
Add texts to the slides
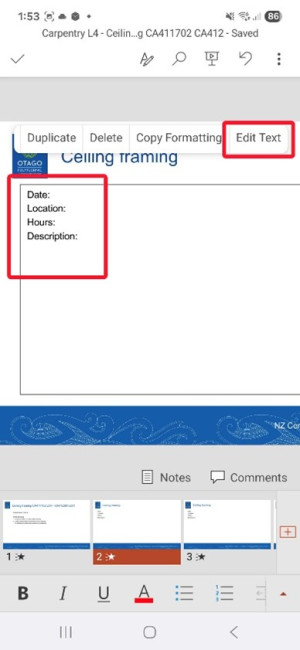
|
Add text by selecting the text box and scrolling right on the edit bar until you see Edit Text. |
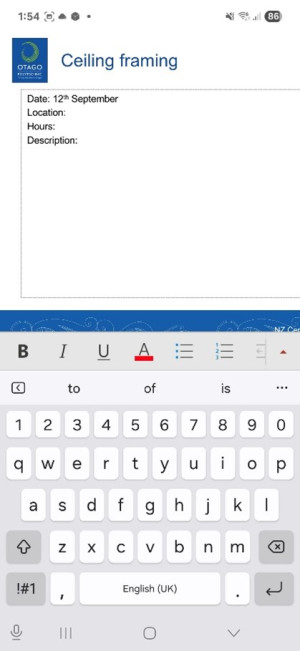
|
Type in the activity details. |
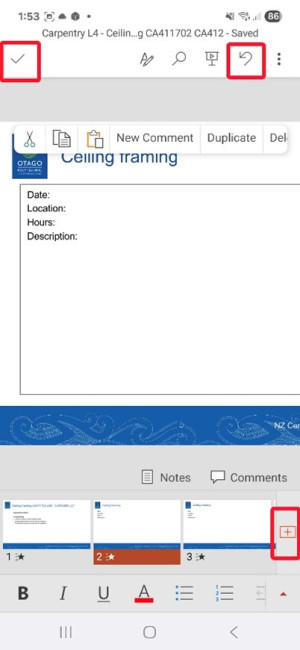
|
To undo, click the curved arrow at the top. To add more slides, click the plus button at the bottom right. To save and exit, click the tick at the top left. |
Exit the PowerPoint
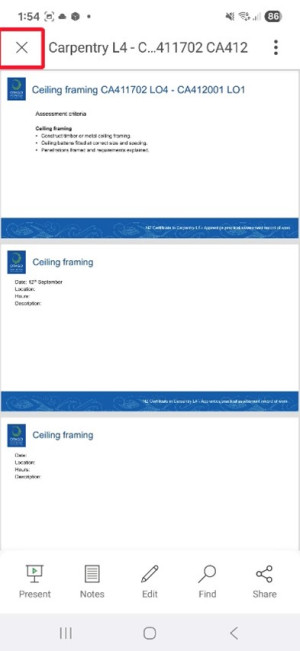
|
To exit the PowerPoint, click the X at the top left corner. |
Hand in your work

|
When you have provided all the evidence for the assessment criteria in an assessment, click Hand in to submit and notify your facilitator. Once you have provided sufficient evidence to pass the criteria you will be granted a competent grade. If you have not provided sufficient evidence your facilitator will return it to you with a grade of ‘limited supervision’. This gives you the opportunity to provide further evidence and then hand in again. |
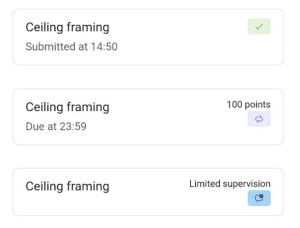
|
A green tick means you have handed in the assignment A circular arrow icon means the assignment has been returned to you. A speech bubble means you have received a comment from your facilitator.
|
Resubmission
See the section on resubmission to find out how to hand in your work again.