

Remote access: RDS
RDS is a service that provides remote access to the Otago Polytechnic network. This means you can study offsite, such as from home, or use specific software on your own computer.
About RDS
Otago Polytechnic's primary remote access solution is called RDS which is short for Remote Desktop Services.
Where can I access RDS from?
You can access RDS through your browser which doesn't require any installed software (recommended method - although it may not work on all mobile browsers). You can also use an RDS app which requires a little more set up.
RDS works both within the internal campus network as well as externally (from home or another remote campus) – wherever there is an internet connection available.
With RDS, you launch one or more published applications which are called RemoteApps. There is no visible operating system as it is only the apps themselves that are published.
File Access – H and I drives
You can launch the RDS RemoteApp MS Word, and open and save files from shared locations such as your personal H drive, OneDrive for Business and other shared drives (e.g. J shared for staff or I Courses for students). These shared drives are automatically available within RDS applications.
You can also launch File Explorer directly, browse to a file and open it from there. If you double-click a .docx file, it will launch the RDS RemoteApp version of MS Word and open that file. Similarly, other supported file types (e.g. most MS Office docs, PDFs etc) will open in their respective application when opened from File Explorer.
App settings are maintained between sessions too, so you can pin a favourite folder in quick access in Word and it will stay pinned for next time, as well as between different applications.
Can I print from a RDS RemoteApp?
Yes, but only to campus-connected printers. It is not possible to print to printers installed on your own computer.
To print from an RDS RemoteApp, use the hold/release print queues:
- MPRINT_BLACK – Black and white printing
- MPRINT_COLOUR – Colour printing
Print jobs are held in the queue and are only charged once they are released at an MFD (Multi-Function Device). These are the large Fuji Xerox printers/copiers located throughout campus, including the Robertson Library.
How can I tell RemoteApps apart from apps that are installed on my computer?
RemoteApps (e.g. applications that are launched from remote.op.ac.nz / RDS) show up in the taskbar just like normal apps that are installed on your computer.
However, the icon in the taskbar will be slightly different and will include a small RDS overlay as shown in the example below.
The first three apps are RemoteApp, the last three are exactly the same apps launched locally:

Why am I getting a strange prompt for my password again?
If you are using the recommended access method (remoteweb.op.ac.nz), you should only need to enter your username and password once, and then complete a multi-factor authentication (MFA) prompt on your mobile device.
If you are accessing RemoteApps via remote.op.ac.nz or a mobile app, you may see an additional prompt for your username and password.
Your username can be entered either as username@op.ac.nz or opnet\username as shown in the examples below.
You'll only see this additional prompt when accessing Remote Apps from remote.op.ac.nz, you won't see it if using the lite HTML5 version (remoteweb.op.ac.nz).

Using RDS through a browser - All platforms
For the majority of use cases simply running OP RemoteApps within a tab of your favourite browser may be enough.
This can be achieved by using the HTML5 portal - it works in most major browsers although it may not work properly on mobile devices such as phones/tablets.
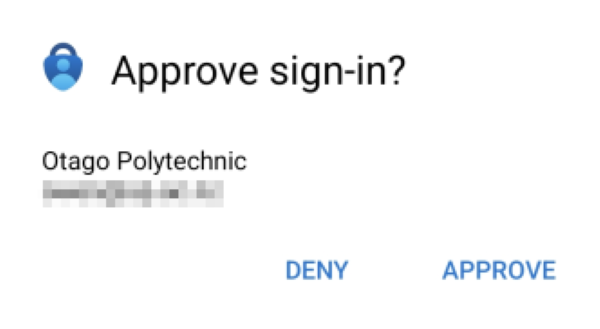
RemoteApps will launch within browser, and multiple opened RemoteApps will show a small tile along the top of the screen for ease of switching between them. When launching an app, you will be prompted to approve a sign-in using Multifactor Authentication (MFA).
In a web browser go to remoteweb.op.ac.nz and you should see the screen below.
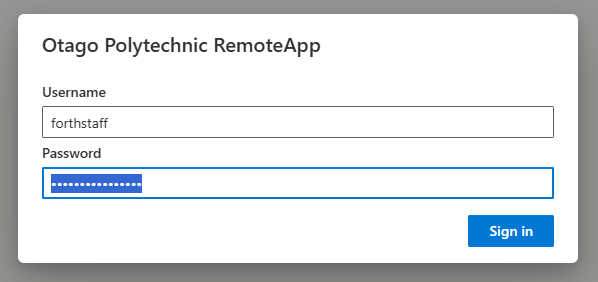
Login using your normal OP username and password.
You will then be presented with a portal showing all your available RDS RemoteApps.
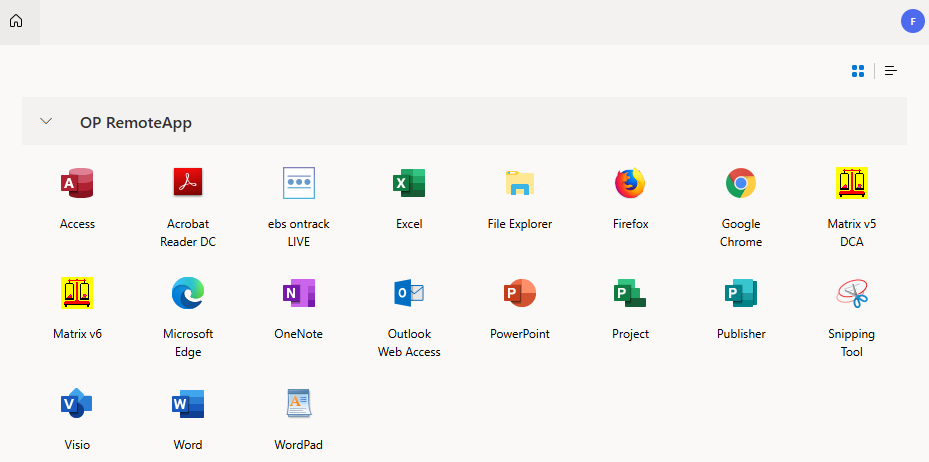
To launch a RemoteApp simply click on it.
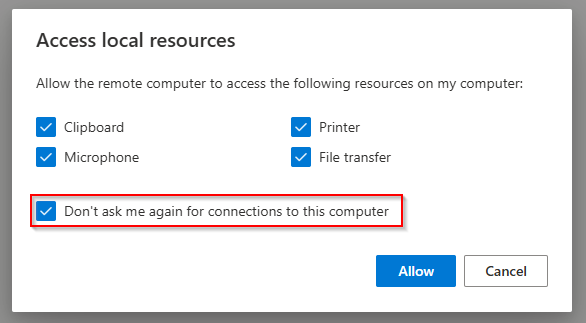
On first use, you may see a prompt asking you to allow access to local resources - click allow (and optionally tick the "don't ask me again" box to stop it asking every time).
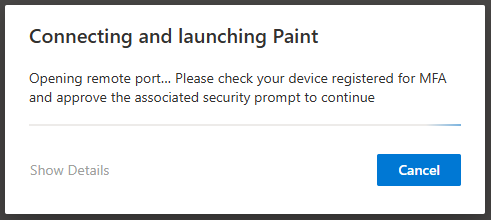
Once you click a RemoteApp to launch it, this is where your MFA prompt should occur on your mobile device.
The screen should show something similar to this, where it is waiting on the MFA response:
Example notification from a mobile device:
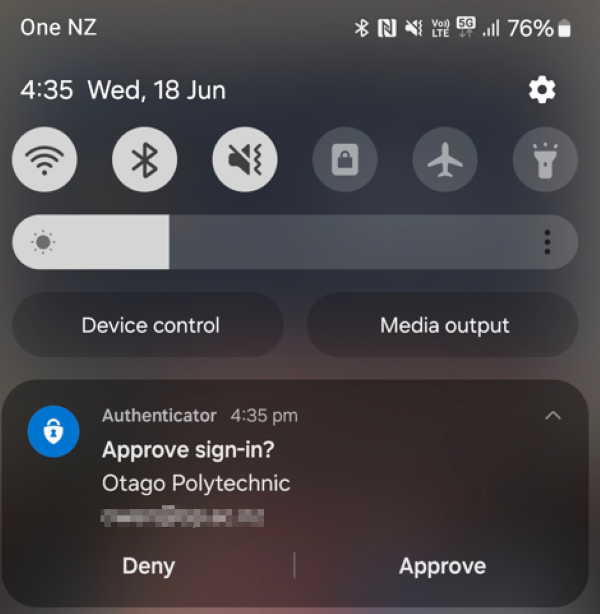
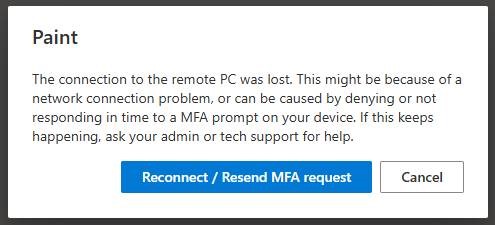
It is important to approve the prompt on your device as soon as possible. If you're not quick enough it will likely stay on this prompt indefinitely.
If this does occur, simply click the Cancel button shown, at which point it will show another dialogue where you can click the "Reconnect / Resend MFA request" button, then approve the associated prompt on your device, after which point your RemoteApp should open.
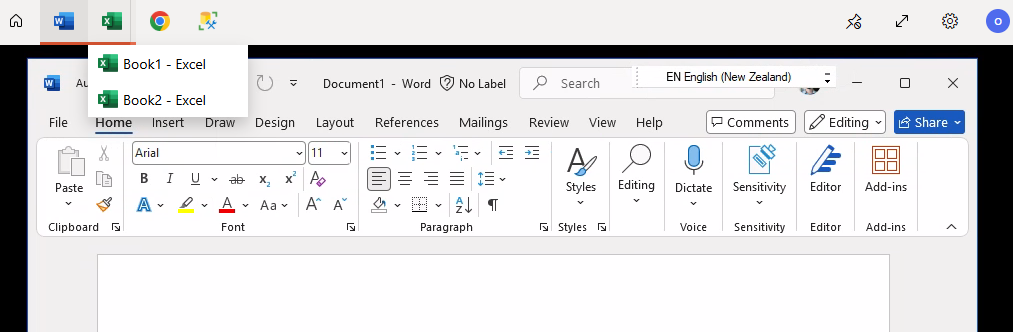
Opening subsequent RemoteApps can be achieved by clicking "Home" at the top left and simply opening additional RemoteApps.
Each different RemoteApp will show its tile along the top, and if you open more than one document at a time, the tile will show a number - hovering over the tile you can jump between the open documents:
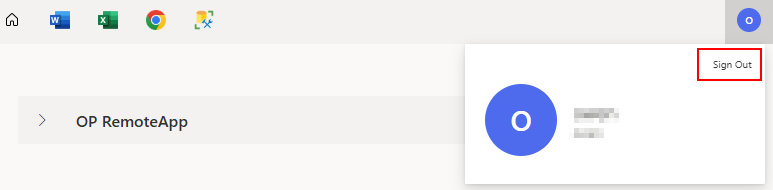
To sign out, simply click the icon on the top right and choose "Sign Out" - remember to save your open documents first.
Using RDS with a Windows/Apple Mac
For more information on using the RDS app with a Windows 10 or later or an Apple Mac visit the knowledge base article for step by step instructions.
You may need to sign in with your OP username and password.
Using RDS at the Robertson Library
RDS RemoteApp is Otago Polytechnic's access method for students using computers at the Robertson Library. Here is what you need to know about file access to the H and I drives, printing and how to ensure you log off correctly or switch to the University virtual computing environment.
With RDS RemoteApp, you launch one or more published applications. There is no visible operating system as it is only the apps themselves that are published.
Visit the eduroam page to find out how to get free wifi at the Robertson Library.
What is special about using RemoteApps at the Robertson Library?
Because the Robertson library is a shared space between the University of Otago and Otago Polytechnic, the machines there are set up so that students from either institute can login to their respective system and access their documents and print.
There is no underlying operating system visible because RDS RemoteApps are just the published applications themselves. You access the RemoteApps from a web portal after signing in. Here is how to navigate to them:
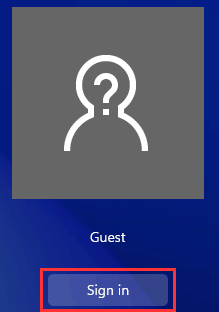
From the login screen, look to the bottom left corner and click on “Guest”

Click on Sign in
Wait for the computer sign-on process to complete, and you should be presented with the RemoteApp login page in a kiosk environment which looks like this:
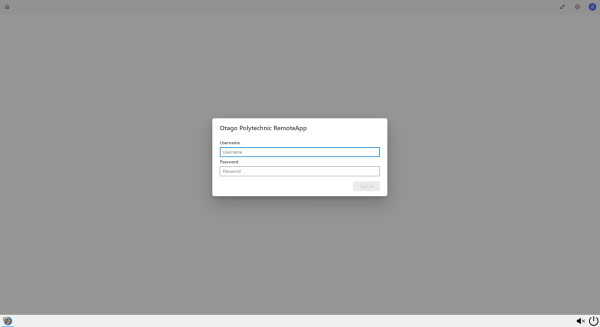
Login with your normal username and password to get access to published RemoteApps such as webmail, browsers and MS Office applications.
File access - H and I drives
You can launch the RemoteApp for MS Word, and open and save files from shared locations such as your personal H drive, OneDrive for Business and other shared drives (e.g. J shared for staff or I Courses for students).
You can also launch File Explorer directly, browse to a file and open it from there. If you double-click a .docx file, it will launch the RDS RemoteApp version of MS Word and open that file. Similarly, other supported file types (e.g. most MS Office docs, PDFs etc) will open in their respective application when opened from File Explorer.
App settings are maintained between sessions too, so you can pin a favourite folder in quick access in Word and it will stay pinned for next time, as well as between different applications.
Printing
There are dedicated hold/release queues for Black/White and Colour called “MPRINT_BLACK” and "MPRINT_COLOUR" which can be used to print a document and then the document can be released from most large Fuji-Xerox copiers around campus, including in the Robertson Library.
![]()

USB drives
Due to changes with the University computing environment, USB storage devices are no longer supported for opening or saving files. They present a significant security/malware risk and are unable to be passed through into the environment.
The recommended way to “transport” files in between home/campus systems is to use cloud storage such as Microsoft OneDrive (1TB of free cloud storage) or by emailing documents to your student email account.
Log off when you’re done
When you have finished it is important to log off before you leave. If you simply walk away, some of your applications could remain running and allow other users to view/access your files. This could include your private information and files such as those stored in your OP email account or within the Student Hub.
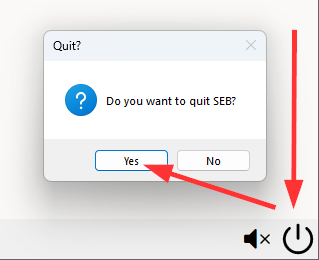
Make sure you have saved any open files, then simply click the power button icon in the bottom-right corner as shown. You will get a confirmation dialogue similar to the one shown, and by clicking “Yes” the computer should return to the main Windows login screen ready for the next OP or Uni user.
If you have questions or need IT assistance please contact the Service Desk or log a job in Service.
Attribution
Hero image: Blue and white mesh by Brett Sayles, licensed under a Pexels.com licence.