OP Mahara
OP Mahara is an ePortfolio platform that you can use as an Otago Polytechnic learner. Follow this guide to learn how to create an ePortfolio.
What is an ePortfolio?
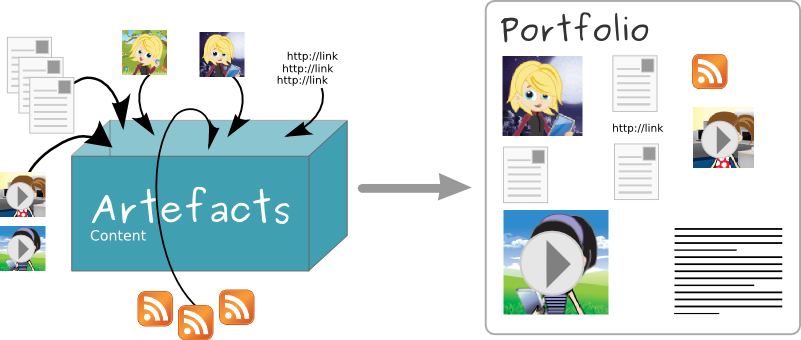
An ePortfolio is a system in which you can record ‘evidence of lifelong learning’ – such as writings, records, artwork, videos that you produce that can be stored digitally.
With OP Mahara, you control which items and what information within your portfolio others see. These items and information are called artefacts in Mahara.
You can control the access by choosing which artifacts you add to a page. You can have as many pages as you like, each with a different number of artefacts, intended purpose and audience. Your audience, or the people you wish to give access to your page, can be added as individuals or as a member of a group. It can even be made publicly available.
You can add pages into a ‘collection’. A single page or a collection of pages can make up your portfolio.
Depending on your course, you could be asked to add many different things to your ePortfolio. This guide will help you create an amazing ePortfolio!

OP Mahara Quick Guide
Use this quick guide to get yourself set up with a basic eportfolio in OP Mahara. This quick guide is for non-template eportfolio users. Use the step by step guides below to support you with the rest of your eportfolio creation, sharing and editing.
Getting Started with OP Mahara
Quick guide
To create a Mahara account you need to access it for the first time through Moodle. Look for the link in your Moodle course.
Click on the icon and you will go directly to Mahara.
Logging into Mahara
Once you have created an account in Mahara by accessing it through Moodle for the first time, you will have two ways to get to your account:
• Clicking on the Mahara icon in your Moodle course again.
• OR go to Mahara.op.ac.nz and Sign in.
You need to create pages to then add them to your ePortfolio collection.
a. Add a page by clicking on the large Create button on your Dashboard or using the main menu dropdown to access Portfolios
b. In the Portfolios section click on the Add button and choose Page.
c. In the new page form, fill in the title field in the Basics section (1 below).
d. The press Save.
e. Repeat this process to create as many pages as you need.
Use the ‘return to the Portfolios’ section button to start at step b.
a. On the Portfolios page click the Add button and choose Collection (see screenshot above).
b. Add a collection name. Remember to name it something descriptive and unique, eg. [Your name – Name of project – date].

c. Click Next:Edit collection pages
d. Choose the pages you need to add by ticking the box beside the pages and clicking Add pages.
e. Then click Next: Edit access.
Your teachers will need access so they can give you feedback on your work.
a. Click on Share with and choose 'Person'.
b. A search box will appear next to it, and you can search by name to find who you would like to share with.

c. Next, choose the role that you are giving them. Use ‘Manager’.
d. Click Save.
You are now ready to add content or ‘artefacts’ to your ePortfolio. This webpage has step by step instructions to help you.
OP Mahara Quick Guide - Midwifery and Nursing
Use this quick guide to get yourself set up in OP Mahara if you are using a template portfolio, such as Midwifery or Nursing.
Use the step by step guides below to support you with the rest of your ePortfolio creation, sharing and editing.
OP Mahara Quick Guide – Midwifery and Nursing
To create a Mahara account you need to access it for the first time through Moodle. A link has been added to your Moodle course.
Click on the Mahara icon in your Moodle course to create your account.
Once you have an account, you can access your Mahara account in two ways:
-
By clicking on the Mahara icon in your Moodle course
-
OR by going to Mahara.op.ac.nz and signing in with your OP username and password.
Check out your Mahara dashboard and find your way around.
Change your notification settings so you don't recieve too many emails.
The email digest option might work best as this means you only get one email per day for all notifications.
Your teachers will have already copied an ePortfolio template into your Mahara account which you will use to collect evidence.
You can find this ePortfolio by:
a. Clicking on the Create button on your dashboard
b. Or using the main menu dropdown to access Portfolios.
In the Portfolios section you will see your ePortfolio template.
All the templates will be named the same thing. Add you name and year to the name so that it can be identified as yours.
a. To edit a portfolio, click on the three dots at the bottom right of the ePortoflio tile (circled in red in the screenshot).
b. Choose Edit from the dropdown menu.
c. Edit the name and click save at the bottom of the page. Remember to name it something descriptive and unique, e.g. [Name of portfolio - your name – date.
Your teachers need access to your ePortfolio so they can give you feedback on your work.
Follow these steps to share your ePortfolio.
You are now ready to add content or ‘artefacts’ to your ePortfolio. The page has step by step instructions to help you.
• Editing pages and collections
a. When adding content to a template, click on the pencil icon to enter edit mode in the menu at the right-hand side of the screen.

b. Next, click on the cog icon where you would like to add content.
c. Upload your document and click save. Your teacher may have made the block retractable so click the arrow beside the title to view the document.
Logging into Mahara
Creating an account
To create a Mahara account you need to access it for the first time through Moodle. Your teacher will have added a link into your course.
Click on the puzzle icon and you will go directly to Mahara.
Logging into Mahara
Once you have created an account in Mahara by accessing it through Moodle for the first time, you will have two ways to get to your account:
-
Clicking on the Mahara icon in your Moodle course.
-
OR go to Mahara.op.ac.nz and Sign in.
Your dashboard
Once signed in you will see your OP Mahara dashboard.
Your dashboard items
- Create – Create pages and collections and develop your portfolio
- Share – Control who can see and access your portfolios
- Engage – Find other people and join groups
Access a drop down main menu that also gives access to Create, Share and Engage, as well as Manage your portfolios and navigate back to the dashboard.
Click on your image to access the account menu, which includes a sign out option.
Access the groups you are part of in this block
Edit your profile by clicking on your name or image
Click on the Edit dashboard button to change the order of the blocks you see on the dashboard.
See who has been online in the last 10 minutes in this block
• Latest changes I can view
• Inbox
• My portfolios
• Topics I am following
Tip
Click the OP logo at the top left-hand corner to navigate back to your dashboard at any time.
If you have any issues with using OP Mahara please talk to your teacher, contact the IT Support Service Desk or create a Service request.
Notification settings
Your notification settings are all set by default to email.
You can change them by clicking on the Account menu arrow at the top right-hand corner to activate the drop-down menu.
Click on Settings, then Notifications.
Your notification choices are:
-
Email digest (one email per day for all notifications)
-
Email (default)
-
Inbox (Your message inbox in Mahara)
-
None
Remember to click Save at the bottom of the page when you are finished.
Uploading files
You can upload files to be stored as artefacts in your OP Mahara.
Unless artefacts are placed in a page, they are not visible to anybody but you. You can use files that you uploaded or journal entries you wrote in as many pages as you wish. You only need one copy of your artefact.
To upload files
There are two ways to upload files:
-
Use the Files upload section
-
Upload as you place something on a page
Use the Files upload section
Access the files section from the main menu.
Browse your files to upload or drag and drop to upload.
See how much storage you have left in the Quota block on the right-hand side of the screen.
Create a folder to hold a collection of files (see arrow above). This is recommended to help you keep track of your files, and necessary if you want to upload artefacts from the Mahara app.
- Add to a folder by dragging a file into a folder in the Home section
- OR add to a folder by:
-
Navigating to a folder
-
Then uploading a file.
- To edit a file click on the pencil icon
-
To delete a file click on the rubbish bin icon
Upload as you place something on a page
When you are adding content to a page you will have the choice to either:
-
Upload an artifact or
-
Choose from your files
Please see the section on editing your pages and collections for more information.
Creating pages and collections
Your ePortfolio can be a single page, or a group of pages, called a ‘collection’.
Start your ePortfolio by creating some pages to add your content or artefacts to. Once you have some pages you can choose to add them to a collection.
Create a page
Add a page by clicking on Create or using the main menu drop down to access Pages and collections.
In the Pages and Collections section click on the Add button and choose Page.
Fill in the section in the Basics section (1) and press Save.
Find out more about these sections:
3. Skin section (adding a decorative boarder and banner)
Create a Collection
Click the Add button and choose Collection
Fill out the sections below:
-
Collection name
-
Collection description
Then click Next:Edit collection pages
Add pages to your collection
Now you need to add some pages to your collection.
Choose the pages you want to add by ticking the box beside the page and clicking Add pages.
Then click Next: Edit access or cancel to exit.
You can then choose who you wish to share this collection with.
Find out more about sharing your work in the Sharing your ePortfolio section. This is optional and you can click ‘cancel’ to be taken back your Pages and collections page.
Editing pages and collections
Once you have created a page you can edit it to add content/artefacts to it.
In a page, access the side menu (far right-hand side) to:
-
Magnifying glass icon: See details of things on the page
-
Pencil icon: Enter the edit mode to add/dit parts of the page
-
Three dots: Access more options such as copy and delete the page.
To edit a page and add artefacts
Click the pencil icon to enter the edit mode.

Use the edit menu on the right-hand side of the screen to edit your page.
The edit menu
Drag and drop this icon to add an artefact to your page
Click this button to edit your page settings
Click this button to exit the edit mode and see the page presentation.
Click this button to share your page with others.
Exit the page
Adding a new block
Click the Drag to add a new block button and drop it onto the page.
A Placeholder: Configure block will pop up.
Add a name for your block and then choose a content type. Remember to click Show more to see more content types.
Click Save when you have finished adding your content.
Content types
Follow the links to find out how to add individual content types:
Editing a block
Once you have created a block you can edit the contents by clicking on the pencil icon to enter edit mode in the menu at the right-hand side of the screen.
A cog icon will appear at the top of each block, click this to edit the contents. Click on the rubbish bin icon to delete the block.
Adding large files and videos to a page
There is a 200mb limit to what you can upload to Mahara, so if you would like to include a large file you can use your OP OneDrive to store your them and then share a link in OP Mahara. Watch the video below for instructions.
Remember, you must create a shareable link in your OneDrive for access to be granted to the file. Copying the URL address will not work.
Create a shareable link in OneDrive
In your OneDrive in a browser, navigate to the file you wish to share and hover over the name until the arrow icon appears. Click this icon.

A Send link pop up window will appear.
Add editing rights
If you want the document to be editable (and comments made), click on People at Otago Polytechnic with the link can view.
A new pop up will appear. Tick Allow editing, then Apply.
Click on the copy link button.

The link will then copy to your clipboard. Navigate to your Mahara ePortfolio and paste this link into an external media block.

Moving blocks on a page
In the edit mode, use the four arrows icon in the top left hand corner of each block to drag and move them around the page.
To resize the blocks use the two arrow icon in the bottom right hand corner to click and drag to the right size.
Edit a collection
To edit a collection, click on the three dots at the bottom right of the collection block.
Choose Manage from the menu.
Add pages by ticking the box beside the page you wish to add and clicking Add pages.
Remove a page from a collection by clicking the x beside the page in the section ‘pages already in collection’.
Adding a skin to your pages
Skins are decoration and personalisation for your portfolio pages. You can create skins yourself, edit them, and use other people’s skins on your portfolio pages and your profile page.
Skins can only be applied to personal portfolio pages. They don’t change the way any other part of Mahara is displayed. The OP theme dictates how things are displayed in OP Mahara, unless you makes changes to your personal pages.
There are three main parts to a skin:
Choose a banner image or background colour
Choose a background image or background colour. The image can be repeated down the sides.
Choose the colour and font of the text of the header, block heading and content.
Create a skin
Go to Main menu → Create → Skins.
Follow the instructions in the Mahara Manual to
Portfolio completion – sign offs
A sign off function may have been added to the top right of each page of your portfolio. When you have completed all sections on a page you can ‘sign off’ your work by ticking this function.

This will let your teachers know that you have finished the page so that they know to give you feedback. They can then verify the page by ticking the verified button, so you will know at a glance that they have seen it and it is all complete.
Sharing your ePortfolio
You can share your work in OP Mahara with a person, a group, or even make it public. No one can see your work unless you choose to share it.
Your teacher may ask you to share your ePortfolio with them so that they can look at your work and give feedback on your progress, assess it, or verify it. Follow the steps below to find out how to do that.
There are two ways to share an ePortfolio, by sharing a collection or by sharing a page.
Share a collection
To share a collection, got to the section Pages and collections (Main menu → Create → Pages and collections).
Find the collection you wish to share and click on the padlock icon in the bottom left of the collection tile, and choose manage access.
Once you are on the Edit access page, choose person in the ‘Share with’ dropdown menu.
A search box will appear next to it, and you can search by name to find who you would like to share with. Note that this list is only for OP Mahara users.
Select a role
Next you can choose their role that you are giving them:
No special role means they can view your work and comment on it.
A peer role means they will be able to comment in the peer commenting blocks (if you add them).
A manager role means they will be able to comment and verify your work.
Both of the above permissions combined.
A reviewer role means they will be able to review your work and comment.
Once you have chosen a role for the person, click save.
The person with whom you have shared your pages or collections with will receive a notification.
Share from a page
To share a page with someone, find the padlock icon on the page you want to share and click through to Manage access.
Next, follow the same instructions above in the section ‘Share from a collection’
Important note
If the page is part of a collection, you will be giving them access to the whole collection as well as the page.
Manage your sharing
You can manage your access in the Shared by me section of Mahara. Get there by using the big Share button on your dashboard or the main dropdown menu.
On the Shared by me page you can edit the access to your collections or individual pages.
Click on the padlock icon to edit the access of each item.
Shared with you
Others may choose to share their content with you also. You will receive a notification when this happens. You can see the things others have shared with you in the Shared with you section.
Secret URLs
You can also create a Secret URL to share with anyone. This URL will provide anyone with direct access to your work. Because it doesn’t require a OP Mahara login, anyone with the link can use it.
Click on the world icon to create this link.
Commenting
You can choose if you would like others to be able to comment on your work by editing the comment options.
Once you have shared your work with others, they will be able to leave comments on a page, collection, or some types of individual artefacts. The same applies if someone shares their work with you.
You can see the comments left so far at the bottom of each portfolio page or the artefact page that contains the artefact’s metadata.
Private or public comments
Comments can be public, so others can see it, or private, and only visible to you as the owner of the work. Find out more about public and private comments.
View and add comments
Find out more about viewing and adding comments:
Submitting your ePortfolio
To assess your ePortfolio your teacher may ask you to submit it through Moodle for marking.
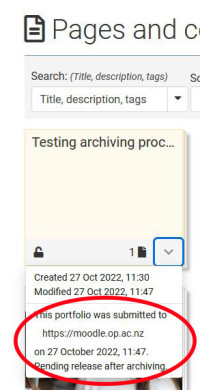
Warning! Anything left in draft form will NOT be visible to your teacher once it has been submitted. Before submitting, check that everything is complete and visible as your ePortfolio may be locked after it is submitted.
To submit your ePortfolio, navigate to the right Moodle course, and find the correct assignment submission activity.
Click Add submission
A list of your Mahara pages and collections will be listed. You can also search your Mahara pages and collections.
Once selected, click save changes.
Locking a submission
Your teacher may choose to lock your submission once it has been submitted. This means you won’t be able to make any changes to it. You teacher may unlock it after it has been graded or keep it locked for longer. Please talk to them about their marking decisions.
Make a copy of your work
You can make a copy of any locked page or collection and keep adding items from there.
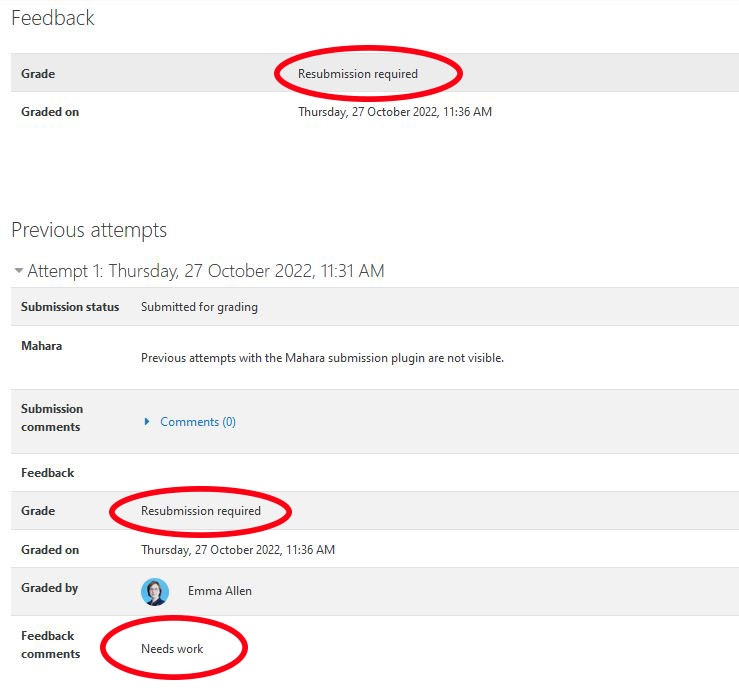
Navigate to the assignment in Moodle by clicking the link in the email. If you scroll down, you will be able to see the grade and the feedback given to you by your teacher.

Your ePortfolio will now be unlocked and you can make any changes or updates needed in Mahara.
If your ePortfolio in Mahara is coloured a slight yellow, it means that it is still locked and may need more time to be released.

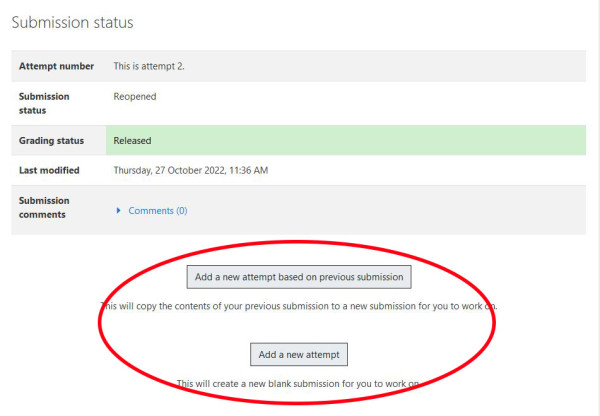
Ready to resubmit
Once you are ready to resubmit, return to the Moodle assignment.
You will see two options for resubmission. Either will allow you to select the right ePortfolio and resubmit.

Once resubmitted your ePortfolio will again be locked in Mahara until your final mark is released by your teachers.
Exporting ePortfolios and files
If you would like to retain a copy of your ePortoflios, you can export a copy to keep.
Once exported you will receive a ZIP archive in your downloads folder that includes your content in both HTML and Leap2A formats. You can view your portfolio in a browser via the index.html file or import the content in another portfolio platform that supports the Leap2A format.
Important note
You will be able to view your content, but not edit it directly in either format (HTML and Leap2A). You will be able to copy and paste the content from the HTML version.
Export your portfolio
From the top right main menu, click on Manage, then Export.
In the Export your portfolio page, choose the option which you wish to export:
1. All my data – This downloads one zip folder of all your content (if you have a lot of content this process can be slow)
2. Just some of my pages – Allows you to choose and export individual pages (recommended)
3. Just some of my collections – Allows you to choose and export individual collections (recommended)
4. Choose to include comments or not.
Click Generate export
Download your files
From the top right main menu, click on Create, then Files.
Clicking on any of your files will automatically start a download of them to your downloads folder on your computer.
Attributions
This page is licensed under a Creative Commons Share Alike 4.0 Licence
Hero image: Christmas tree light blur. mirekmurmir. Image retrieved from: https://pixabay.com/en/christmas-tree-light-blur-boketh-1226220/ Licensed under Creative Commons License CC0 Public Domain.
(1) Portfolio work with Mahara. Image retrieved from: https://manual.mahara.org/en/21.04/intro/introduction.html Licensed under Creative Commons License CC BY-SA 3.0
Parts of the text on this page have been retrieved from the Mahara Manual, Licensed under Creative Commons License CC BY-SA 3.0


